C# component Example 3: External DLL
This example shows how you can call from your USoft application a method from a C# .NET class library that is made available by an external DLL.
- In USoft Definer, from the menu, choose Define, RDMI, dotNet Components, C# Components from the Define menu. The "C#t Components" window opens.
- Create a simple .NET C# component, by setting Name = MYCLASS and Program Code =
using System;
using System.Text;

class MYCLASS
{
     public static String SimpleClass(String instr)
     {
          return "ok" + instr;
     }
}
The Assembly References field should be left empty at this stage.
-
Press Commit. USoft compiles this code.
-
Press the Check button. The RDMI interface is generated by USoft. If there are already methods and parameters defined, you will be asked if you want to generate a new RDMI interface (the old methods and parameters will be overwritten) or if you just want to check the existing methods and parameters
-
In the Application, check the component using the following command in SQL Command:
invoke myclass.simplecall with select 'simple'
You should see the result:
ok: simple
Creating an External Assembly (DLL)
- Using, for example, Microsoft Visual Studio 2008 build a simple ‘SimpleRDMI’ project using the following code:
In Microsoft Visual Studio 2008 you can do this using the following menu sequence File Menu, New Project, Visual C#-, Windows, Class Library.
using System;
using System.Text;
namespace SimpleRDMI
{
   public static class ExtClass
   {
      public static String Callme(String instr)
      {
         return "External call :" + instr;
      }
   }
}
-
Once this project is built copy the resulting SimpleRDMI.dll file to the <USoftInstalldir>\bin folder.
-
Set Assembly References = SimpleRDMI.dll
-
In the component's Program Source, provide the identity of the namespace where the component was created, and call the external method in the DLL. Use the following code as an example:
using System;
using System.Text;
using SimpleRDMI;

class MYCLASS
{
     public static String SimpleCall(String instr)
     {
          return ExtClass.Callme(instr);
     }
}
- Press Commit.
- Press the Check button.
- In the Application, check the component using the following command in SQL Command:
INVOKE myclass.simplecall WITH SELECT 'simple'
You should see the result:
External call: :simple
Calling the Assembly (DLL) from an alternative location
To make use of an assembly at a location other than the default <usoftinstalldir>/bin folder, you can add it to the Global Assembly Cache (GAC).
- Create a strong name for the assembly, using the Microsoft .NET Framework Strong Name Utility (sn.exe). For example:
C:\Program Files\Microsoft Visual Studio 8\SDK\v2.0\Bin\sn.exe" -k keyPair.snk
- This newly created keyPair.snk file must now be referenced in the SimpleRDMI project Assembly information. In Visual Studio, add the following line to your AssemblyInfo.cs file:
[assembly: AssemblyKeyFileAttribute("c:\\outside_usoft\\SimpleRDMI\\keyPair.snk")]
-
Rebuild your project.
-
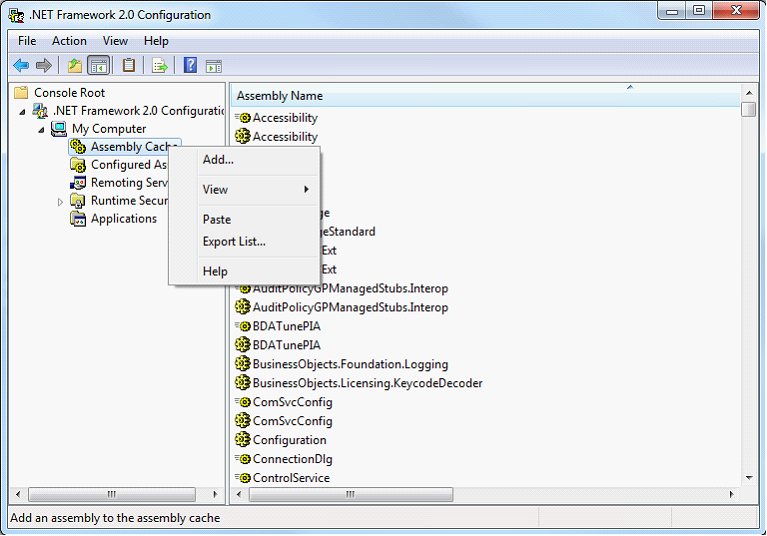
This newly created SimpleRDMI assembly must now be added to the Global Assembly Cache. From the Windows Control Panel, Select Administrative Tools, followed by .Net Framework <version> Configuration, My Computer, then Assembly Cache.
Right click on the Assembly Cache item, choose Add from the resulting menu, and add the name of the SimpleRDMI assembly. The illustration below shows the Windows 7 Control Panel.
- In the DotNet Components window of the Definer, add the name of the newly created SimpleRDMI.dll file to the ‘Assembly References’ field of the component created earlier.

-
Press Commit.
-
Press the Check button.
-
Make sure that the original SimpleRDMI.dll file has been removed file from <usoftinstalldir>\bin, and In the application, check that the component still works with the new assembly location by using the following command in SQL Command:
invoke myclass.simplecall with select 'simple'
You should see the result:
External call: :simple