How to set up USoft as a SCIM server
Configure a Rules Service to act as a SCIM server, so that a SCIM client can manage USoft authorisation data.
Prerequisites
- An installed USoft Rules Service that you can configure. See Installing a USoft Rules Service.
- A USoft Authorizer user account that is linked to an Authorizer role with sufficient privilege to manipulate the data in the Authorizer tables. The SCIM server performs its manipulations on the database under this account.
- A free TCP port in the range 513-65535, reserved for the SCIM server.
- Optionally, a server certificate stored in USoft Authorizer, if the SCIM server must set up an HTTPS connection. See How to store a certificate in USoft Authorizer.
Step 1: Open the configuration wizard
Start the Rules Service and press the Configure button, as described in Installing a USoft Rules Service. A sequence of browser-based configuration dialogs appears.
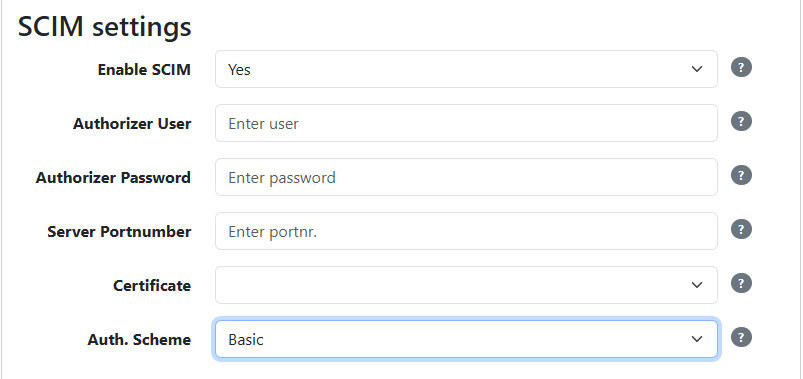
Move through the wizard with the Next button until you reach the page that holds the SCIM settings section.
Press Refresh to update the page with the current Rules Service status. Press Previous to go back a step without validating the fields on the current page.
Step 2: Enable SCIM
Set Enable SCIM to Yes.
The remaining SCIM fields stay disabled while Enable SCIM is set to No. Once you enable SCIM, Authorizer User, Authorizer Password, Server Portnumber and Auth. Scheme all become required.
Step 3: Specify the Authorizer account
Specify the Authorizer User and Authorizer Password of the account that the SCIM server uses to manipulate authorisation data.
This account must be linked to an Authorizer role that has sufficient privilege to manipulate the data in the Authorizer tables.
Step 4: Specify the port number
In Server Portnumber, type the port under which the SCIM server must operate. The value must be between 513 and 65535.
Choose a port that no other service on the machine is using.
Step 5: Select a certificate
Selecting a certificate is optional, and it determines the protocol the SCIM server runs under:
- Select a certificate from the Certificate dropdown to start the SCIM server as an HTTPS server.
- Leave the Certificate field empty to start the SCIM server as an HTTP server.
The dropdown lists the certificates stored in USoft Authorizer for the application. See How to store a certificate in USoft Authorizer.
Step 6: Set the authentication scheme
From the Auth. Scheme dropdown, select the scheme that clients must use to connect to the SCIM server. You can choose between Basic and Bearer.
Basic is HTTP Basic authentication. Clients authenticate with the Authorizer User and Authorizer Password you specified in Step 3. The Bearer Token box stays hidden and is not used.
Bearer is a static bearer token: one token that you fix here and that every client presents unchanged. This can be as simple as a shared secret string or password that you agree on with the identity provider, or it can be a JWT (JSON Web Token) issued by the identity provider. Either way, the USoft platform treats the value as an opaque string, comparing it as-is against what the client presents.
If you select
Bearer, then the Bearer Token box appears and must be filled. Paste the token that clients present when they connect.
The bearer scheme is not OAuth. The SCIM server does not issue, parse, validate or refresh tokens: it only compares the single static value configured here against what the client presents. If you configure a JWT, the USoft platform does not read or act on its expiry claim, and it never renews the token when it expires or rotates on the identity provider's side — the client's presented token simply stops matching, and you must paste in a new value yourself. Treat the configured value as a password and use HTTPS, since it does not expire on its own.
Step 7: Finish the wizard
Press Next.
The SCIM server starts the moment you press Next. Continue through the wizard until you reach the Rules Service overview page, the final page.
The base URL of the SCIM server is displayed on this page. SCIM clients use this URL to connect. For the endpoints available under it, see SCIM endpoints.
The base URL is local to the machine that runs the Rules Service. The USoft platform does not automatically expose it outside that machine. To let a SCIM client on another machine reach the SCIM server, you must arrange that access yourself.
Troubleshooting
| Symptom | Likely cause | Fix |
|---|---|---|
| After you press Next, the wizard stays on the same page and Status at the top of the page reports an error | The SCIM server could not be started | Follow the hyperlink in Status for the error details, correct the SCIM settings, and press Next again |
| The SCIM server does not start and the port is in use | Another service on the machine is already using the port | Set Server Portnumber to a port that is free on this machine |
The Logging row at the top of the page opens the Rules Service logfile, which records what happened during the start attempt.
Logging
When the SCIM server starts, it creates a log file of its own, named SCIM-<portnr>.log, where <portnr> is the Server Portnumber you configured. It records the whole incoming requests, the queries it uses to process this request, and its outcome returned to the client. For the file's location, structure and how to use it as an audit trail, see SCIM logging.
Related documentation
- Introduction to SCIM - what SCIM is and why USoft implements it as a SCIM server.
- How to connect an identity provider to a USoft SCIM server - the identity-provider side of this same connection.
- SCIM logging - the structure of
SCIM-<portnr>.logand how to use it as an audit trail. - SCIM endpoints - the endpoints the SCIM server exposes.
- SCIM users and groups - how SCIM users and groups map onto Authorizer data.
- Installing a USoft Rules Service
- Schemas and extension properties - generating extension properties from a SCIM schema.
- Creating users
- Purpose of server certificates